The first thing that trips up most people getting into Salesforce development is not Apex syntax—it is the environment setup. Which CLI version to install, what the difference is between sfdx and sf, why VS Code extensions are not working after installation, where to enable Dev Hub, whether to use a Scratch Org or a Sandbox—these answers are scattered across five or six different official documentation pages, and it is easy to get lost. This walkthrough covers the full chain from a blank machine to a successful first deployment, including the gotchas along the way.
First, get the concepts straight: what Salesforce DX actually is
Salesforce DX is not a single piece of software. It is an entire development model that Salesforce promotes. The core idea is source-driven development: code and configuration live in a local Git repository and get pushed to an org via CLI commands, instead of clicking through the browser and downloading changes manually. Around this model, Salesforce provides three tools:
- Salesforce CLI—the command-line tool and core entry point for all operations
- VS Code + Salesforce Extensions—the officially recommended IDE, wrapping CLI commands into a graphical interface
- Scratch Orgs—disposable development environments created from a definition file and discarded when done
There is a legacy naming issue that needs to be addressed upfront. Salesforce CLI used to have two versions. The old one was called sfdx (also known as sfdx-cli or v7), deprecated since April 2023. The new version uses the sf command prefix (also known as @salesforce/cli or v2). After installing the new CLI, sfdx commands still work—they are just backward-compatibility aliases for sf. But all new projects and scripts should use sf, because sfdx could be removed entirely at any time. If you find a tutorial online that still uses sfdx force:source:push, it is outdated—the equivalent new command is sf project deploy start.
Step 1: Install Node.js
Salesforce CLI runs on Node.js, so that is the first thing to install. The officially supported versions are Node.js 24 (Active LTS) and Node.js 22 (Maintenance LTS). Node.js 20 has reached end of life—do not use it.
It is strongly recommended to use nvm (Node Version Manager) instead of downloading the installer from the official website. Two reasons: it avoids permission issues (installing global npm packages on macOS/Linux without nvm often triggers EACCES errors), and it makes switching Node versions between projects trivial.
# macOS / Linux: install nvm
curl -o- https://raw.githubusercontent.com/nvm-sh/nvm/v0.40.1/install.sh | bash

# Windows: use nvm-windows from https://github.com/coreybutler/nvm-windows

# Install Node.js 22 (recommended stable)
nvm install 22
nvm use 22

# Verify
node --version   # should show v22.x.x
npm --version    # should show 10.x.x or higher
Step 2: Install Salesforce CLI
There are two installation methods: npm global install and OS-specific installers. npm is recommended because updates are easier and the setup matches CI/CD pipelines.
# If you previously installed the old sfdx-cli, uninstall it first
# — it blocks new CLI installation
npm uninstall sfdx-cli --global

# Install the new Salesforce CLI
npm install @salesforce/cli --global

# Verify
sf --version
# Output like: @salesforce/cli/2.x.x linux-x64 node-v22.x.x

# Run diagnostics
sf doctor
sf doctor checks Node version, CLI version, plugin status, and more. Run this first when you hit environment issues.
If your team needs to pin the CLI version (for example, for reproducible CI/CD builds), you can install it at the project level:
# Project-level install with pinned version
npm install @salesforce/cli@2.71.4 --save-dev

# Run the project-level CLI via npx
npx sf org list
Another gotcha: Salesforce CLI now uses a just-in-time plugin installation mechanism. Not all commands are pre-installed—some plugins download automatically the first time you invoke them. So the first run of certain commands will take a few extra seconds. This is normal.
Step 3: Install VS Code and Salesforce extensions
The minimum VS Code version is 1.90. If yours is older, update first.
After opening VS Code, press Ctrl+Shift+X (Windows/Linux) or Cmd+Shift+X (macOS) to open the Extensions panel. Search for Salesforce Extension Pack and click Install. This pack includes the core plugins needed for Salesforce development:
- Salesforce CLI Integration—run sf commands from within VS Code
- Apex Language Server—syntax highlighting, code completion, go-to-definition
- Apex Replay Debugger—replay Apex execution from debug logs
- Lightning Web Components—LWC development support
- SOQL Builder—visually build SOQL queries
- Agentforce Vibes—AI-assisted development with natural language code generation (new in Spring '26)
- Salesforce Code Analyzer—static code analysis
There is also a Salesforce Extension Pack (Expanded) that adds community-recommended third-party extensions on top of the core set. If you are unsure which to pick, start with the standard pack.
Plugins worth installing separately
A few extensions that are not in the official pack but are used by virtually every Salesforce developer:
- Apex Log Analyzer (by FinancialForce)—debug log performance analysis, far better than Developer Console
- Prettier + Apex Prettier Plugin—code formatting, essential for consistent team style
- XML Tools (by Red Hat)—handles
-meta.xmlandpackage.xmlfiles; VS Code's built-in XML support is weak
Java dependency
The Apex Language Server runs on the JVM, so you need JDK 11, 17, or 21 installed (21 recommended). On macOS, Homebrew is the easiest path:
# macOS
brew install openjdk@21

# Set environment variable (add to ~/.zshrc or ~/.bash_profile)
export JAVA_HOME=$(/usr/libexec/java_home -v 21)

# Verify
java -version
On Windows, download JDK 21 from Adoptium and make sure the JAVA_HOME environment variable points to the correct path. In VS Code, you can also search Settings for salesforcedx-vscode-apex.java.home and set the JDK path manually.
Step 4: Create an SFDX project
With the environment in place, the next step is creating a project. Open a terminal and run:
# Create a standard SFDX project
sf project generate --name my-sf-project --template standard

# Enter the project directory
cd my-sf-project
The generated project structure looks like this:
my-sf-project/
├── config/
│ └── project-scratch-def.json # Scratch Org definition file
├── force-app/
│ └── main/
│ └── default/ # Default package directory
│ ├── applications/
│ ├── aura/
│ ├── classes/ # Apex classes
│ ├── lwc/ # Lightning Web Components
│ ├── objects/
│ ├── permissionsets/
│ └── triggers/
├── scripts/
│ └── apex/ # Anonymous Apex scripts
├── sfdx-project.json # Project configuration
├── .gitignore
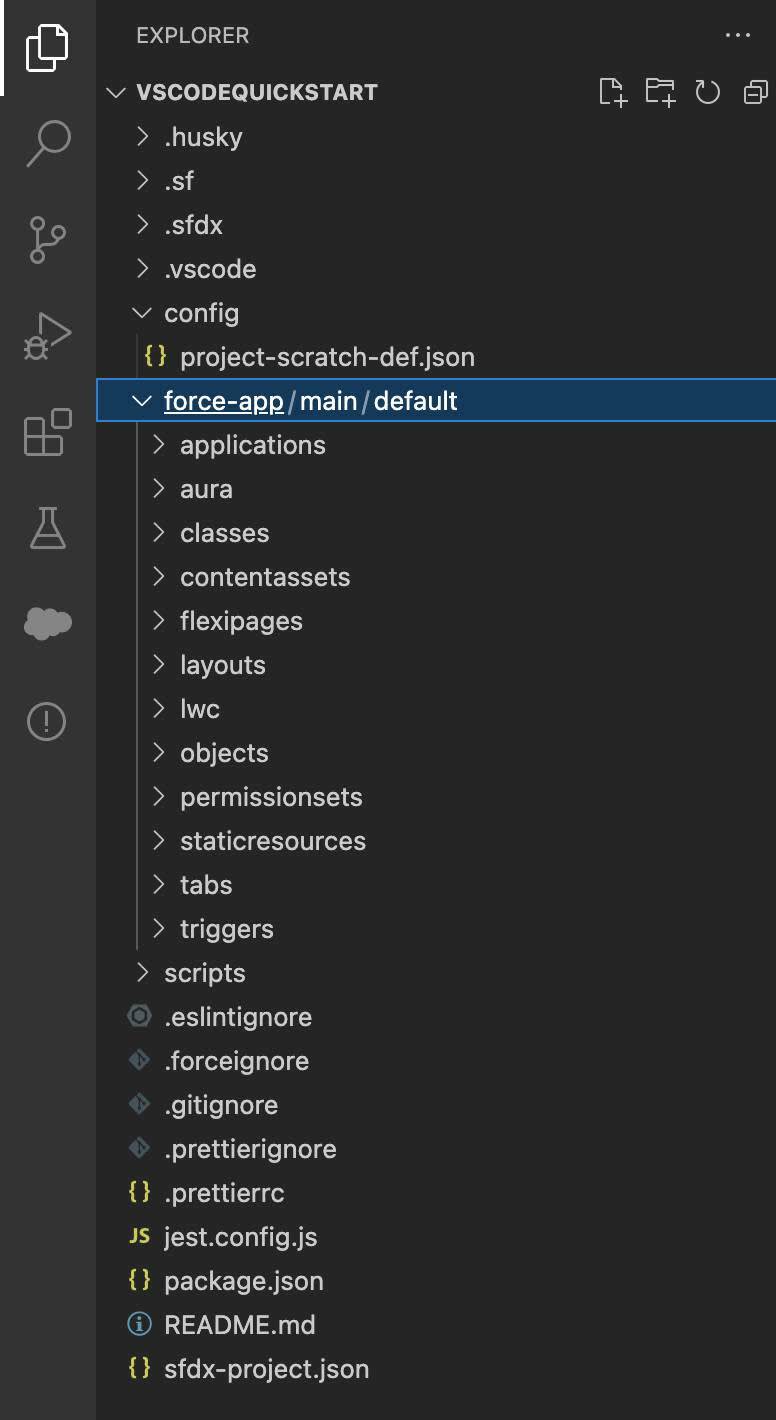
└── README.mdIn VS Code's Explorer panel, it looks like this. Notice the Salesforce-specific icons on the left Activity Bar, the neatly organized metadata-type subfolders under force-app/main/default, and the sfdx-project.json and config/project-scratch-def.json files visible at root level:
Two files to understand:
sfdx-project.json is the master project configuration, defining source paths and the API version:
{
  "packageDirectories": [
    {
      "path": "force-app",
      "default": true
    }
  ],
  "name": "my-sf-project",
  "namespace": "",
  "sfdcLoginUrl": "https://login.salesforce.com",
  "sourceApiVersion": "62.0"
}
Set sourceApiVersion to match your target org. Spring '26 corresponds to API 66.0, but if your org is on an older release, use that version number instead.
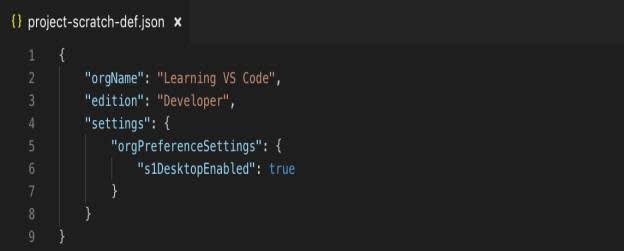
project-scratch-def.json defines the shape of your Scratch Org:
{
  "orgName": "My Dev Org",
  "edition": "Developer",
  "features": ["EnableSetPasswordInApi"],
  "settings": {
    "lightningExperienceSettings": {
      "enableS1DesktopEnabled": true
    },
    "mobileSettings": {
      "enableS1EncryptedStoragePref2": false
    }
  }
}
Here is what the file looks like when open in VS Code's editor:
edition options are Developer, Enterprise, Group, and Professional. Developer works for most development scenarios. Add features you need in the features array—multi-currency (MultiCurrency), communities (Communities), and so on. For the full list of supported features, check the Scratch Org Features page in the official docs.
Step 5: Enable Dev Hub and create a Scratch Org
Scratch Orgs do not appear out of thin air—they depend on a Dev Hub. A Dev Hub is a full Salesforce org (Developer Edition, Enterprise, Performance, or Unlimited) with the Dev Hub feature enabled, allowing it to manage Scratch Org creation and allocation. Sandboxes cannot serve as Dev Hubs—this is a common misconception.
To enable it: log into your org → Setup → search for Dev Hub → toggle Enable Dev Hub on. Be aware: this toggle cannot be turned off once enabled, so do not flip it casually in production. The common practice is to use a dedicated Developer Edition org as the Dev Hub.
Once enabled, authorize the Dev Hub from your terminal:
# Authorize the Dev Hub (opens a browser login page)
sf org login web --set-default-dev-hub --alias DevHub

# Create a Scratch Org
sf org create scratch \
  --definition-file config/project-scratch-def.json \
  --alias MyScratchOrg \
  --set-default \
  --duration-days 14

# Open the Scratch Org in a browser
sf org open --target-org MyScratchOrg
A few things to watch out for:
--duration-daysdefaults to 7, maximum 30. When a Scratch Org expires, it and all its data are gone permanently—no recovery.- A Developer Edition Dev Hub can create at most 6 Scratch Orgs per day with a maximum of 3 active simultaneously. If you keep hitting limits, check whether your company has ISV partner allocations.
- Scratch Org storage is limited to 200MB records + 50MB files. Do not load large test datasets into them.
Alternative path: connect to an existing Sandbox or Production
Not every project fits the Scratch Org model. If you are maintaining a large existing org, or your team has not adopted source-driven development yet, connecting directly to a Sandbox or Production works fine.
# Connect to a Sandbox
sf org login web --instance-url https://test.salesforce.com --alias MySandbox

# Connect to Production (use for read-only ops or emergency fixes)
sf org login web --instance-url https://login.salesforce.com --alias MyProd

# List all authorized orgs
sf org list

# Set a default org
sf config set target-org MySandbox
After connecting, use sf project retrieve start to pull metadata from the org to your local project, edit locally, then sf project deploy start to push changes back. This is called the org development model—a parallel path to the Scratch Org source-driven model. Neither is inherently better; the choice depends on your team's current workflow.
Day-to-day development: push, pull, deploy
With the environment and org ready, daily work revolves around a handful of core commands.
Scratch Org workflow (source tracking)
# Push local code to the Scratch Org
sf project deploy start

# Pull changes from the Scratch Org back to local
# (e.g., after editing a Layout in the browser)
sf project retrieve start

# Preview differences between local and org
sf project deploy preview
sf project retrieve preview
Scratch Orgs have source tracking enabled by default—the CLI automatically tracks incremental changes between your local project and the org, so each push only transfers files that changed. This is significantly faster than full-org deployments to a Sandbox.
Sandbox / Production workflow (manifest-based)
# Retrieve metadata specified in package.xml
sf project retrieve start --manifest manifest/package.xml

# Deploy a specific directory
sf project deploy start --source-dir force-app

# Deploy with tests (Production typically requires tests)
sf project deploy start --source-dir force-app --test-level RunLocalTests

# Check deployment status
sf project deploy report
GUI operations in VS Code
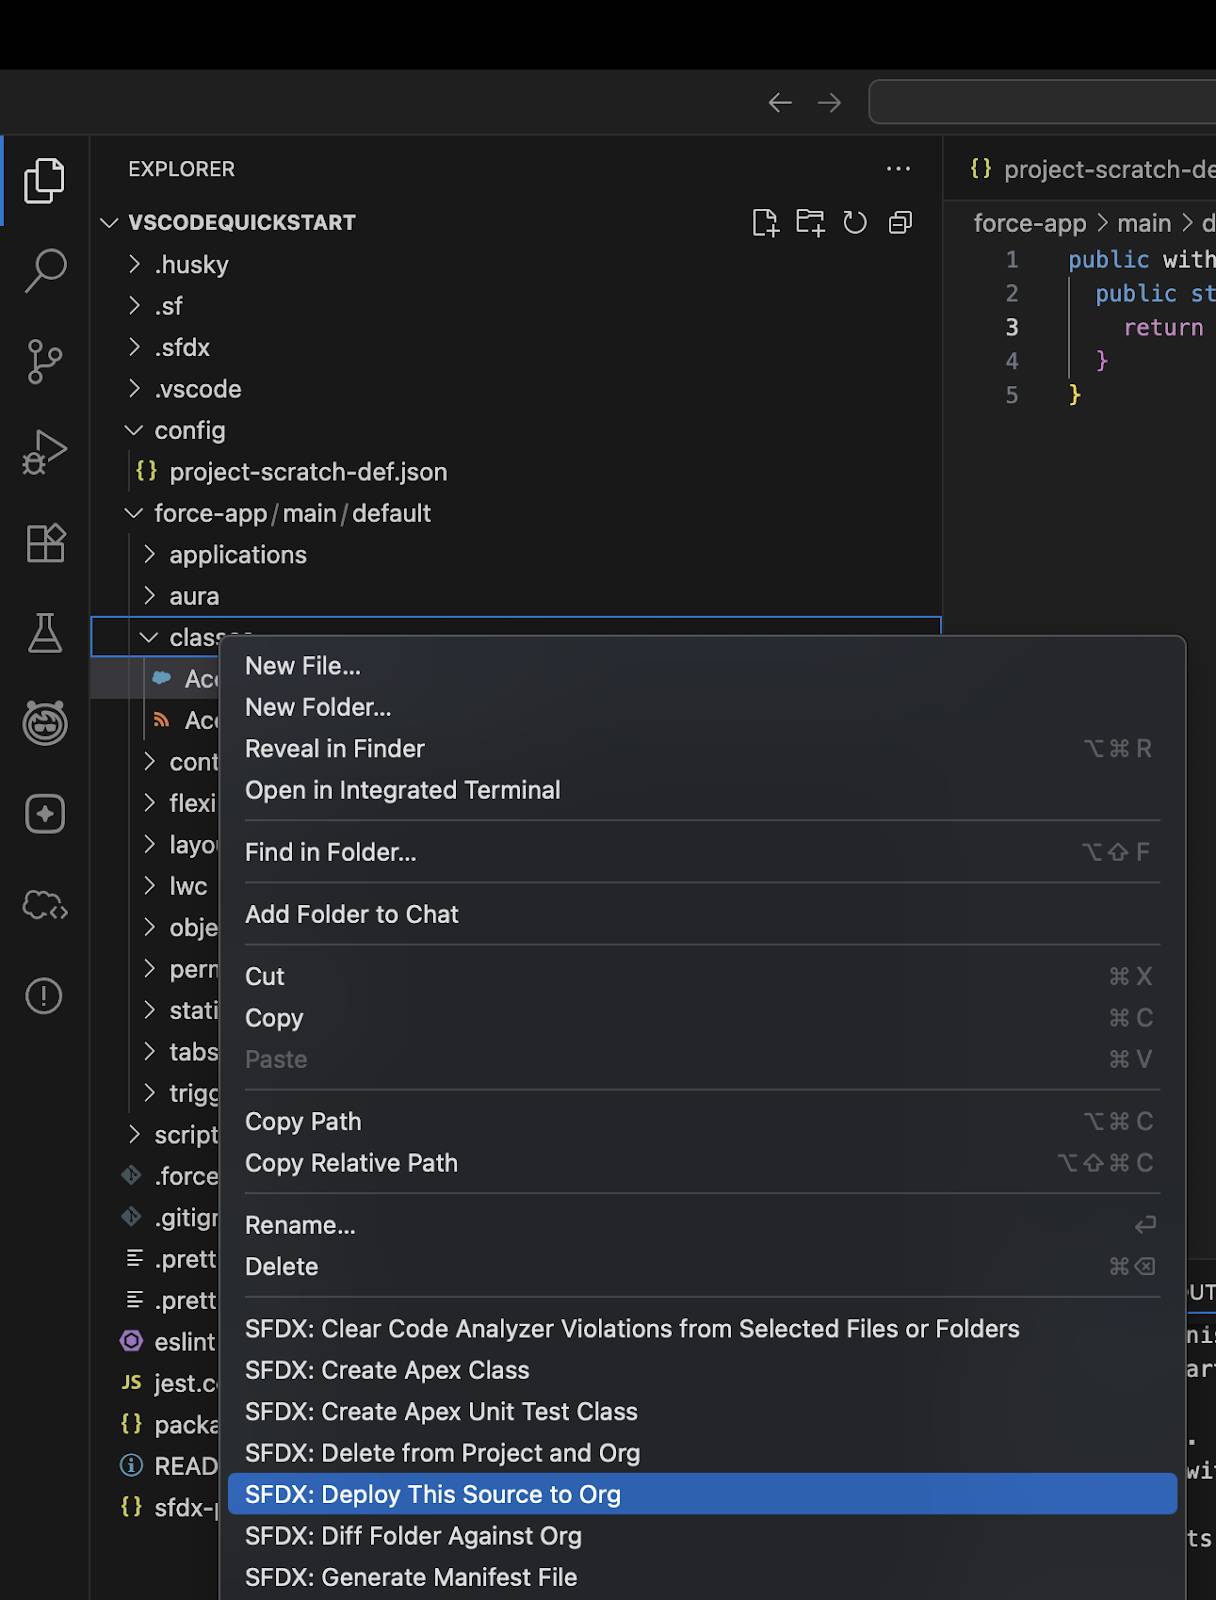
If you prefer not to memorize commands, VS Code's Command Palette (Cmd+Shift+P / Ctrl+Shift+P) lets you search for SFDX to see all available operations—create a Scratch Org, deploy files, execute anonymous Apex, run tests, and more. Right-clicking a file or folder in the Explorer brings up a context menu with SFDX-specific actions like Deploy This Source to Org, Create Apex Class, and Diff Folder Against Org, no command typing required:
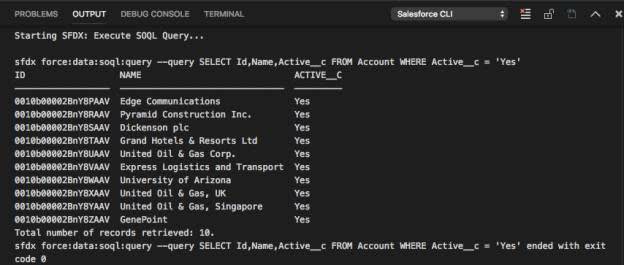
The Output panel at the bottom, when switched to the Salesforce CLI channel, shows the execution process and results of each command. For example, running a SOQL query displays the results as a table right in the terminal:
Common gotchas
| Problem | Cause | Fix |
|---|---|---|
npm install @salesforce/cli fails |
Old sfdx-cli not fully uninstalled |
Run npm uninstall sfdx-cli -g first |
| Apex Language Server not working, no code completion | JDK not installed or wrong version | Install JDK 11/17/21, verify JAVA_HOME |
sf org create scratch says No default dev hub |
Dev Hub not authorized or not set as default | Run sf org login web --set-default-dev-hub |
Push fails with INVALID_SESSION_ID |
Scratch Org expired or token invalidated | Re-authorize: sf org login web --alias MyScratchOrg |
| SFDX commands missing in VS Code | No sfdx-project.json in the opened folder |
Make sure VS Code opens the project root directory |
Production deploy: Code coverage below 75% |
Production requires overall code coverage ≥ 75% | Write more tests, or use --test-level RunSpecifiedTests |
sf commands slow on first run |
Just-in-time plugin installation downloading on first use | Normal behavior—wait for it to finish |
References
- Salesforce CLI Setup Guide | Salesforce Developers
- VS Code Salesforce Extensions Installation | Salesforce Developers
- Build Your Own Scratch Org Definition File | Salesforce Developers
- @salesforce/cli on npm
- Quick Start: VS Code for Salesforce Development | Trailhead
- Recommended VS Code Extensions | Salesforce Developers
- Get Started With Salesforce Scratch Orgs | Salesforce Ben